"Mark4 is scary indeed"
-[FLS]Prozerran
|
| The Principles of War, Volume 1: Offense | | | Author: | | | IP: | 1Cust223XXXX | | Date: | 12/10/00 01:12 | | Game Type: | Other | | Labels: | none | | Report Rating: , # of Ratings: 4, Max: 9, Min: 8
Lifetime Rating for Mark4: 8.6829 |   |
Introduction
Ladies and Gentlemen, welcome to the first report in my “Principles of War” series. I thought I’d try something a little different with this concept, going through the principles of war as taught by the army war college and showing their application to the various games we all know and love. Speaking of games that we know and love, this report is based on Close Combat V, SSI’s real time strategy series set in world war two. Although “real time” might be a little generous, seeing as how the fastest speed is like starcraft on slower… Still, it’s realistic and fun to play, and with the improvements and greater emphasis on infantry in this one, CCV is the best release in the series to date.
Anyway, I wander into the vastly popular MSN online gaming service to be met with the staggering number of five people willing to play CCV. And four were already in games. The last player, going by the name of Canuck, immediately messages me “Let’s play!” He’s obviously been waiting at his screen for at least ten minutes and is as desperate for an opponent as T_Mac is for a date that isn’t Bob. I of course agree, and offer to host the game. “Hill 140” is my chosen scenario, and I elect to take the Americans. The Americans have slightly greater strength in this scenario, but must attack through a lot of nasty terrain…
First things first, I start picking my troops. Given the scenario, I elect to leave all my bazooka teams and .50 cal machine gun teams out of the picture. These units are great for what they are designed for, which is basically sitting in one place until a tank (bazooka) or infantry (.50 cal) unit wanders along. They aren’t so great for stuff that involves walking around, cuz carrying all their heavy special weapons tires them out. Plus all the Scarab sized guys volunteer for those squads for some reason. So instead, this is what I take:
2 command squads: These guys have decent weapons, are hardened veterans, and can rally the other guys around them when their morale starts breaking.
1 Command Sherman: Just like a regular Sherman except for having a better crew and being able to rally troops. The 75mm main gun is good vs light tanks and downwards. Fortunately, there are very few heavier tanks on the german side in this game.
4 Browning Automatic Rifle squads: The workhorse of the American forces, these guys carry a variety of weapons, the most notable being the BAR =]. They can stand up to the toughest German infantry, and even have limited anti-tank capability. Like all infantry, they are vulnerable to indirect weapons like mortars.
2 Assault Engineer squads: These guys have fewer people than a standard infantry squad, but carry heavier weapons. They get tired running long distances, but the flamethrowers they carry make a decisive edge in close combat.
3 M4A1 Sherman tanks: Tanks rule the battlefield. Heavily armored, fast, with superior firepower. Of course, they are pretty easy to sneak up on. And once you get close, a tank can be taken out by most infantry, especially if they get a side or rear shot. One of my tanks also has a flamethrower mounted on it. Gruesomely effective vs the infantry that do make it close.
2 Wolverine 3 inch tank destroyers: These babys are designed to kill tanks. They have large guns, but lesser mobility and armor than tanks. They also have lesser secondary weapons, so infantry are a lot more effective vs them. I picked them up mainly to replace my bazooka teams.
1 81mm mortar: Able to hit anywhere on the battlefield. Great for suppressing infantry and laying smoke.
Principle of war #2: Offense
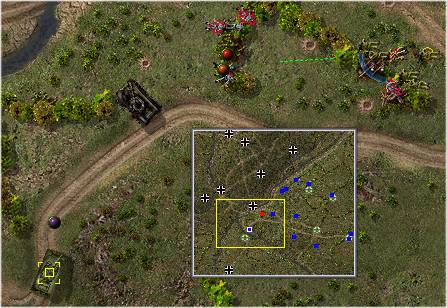
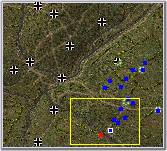 The main objective in this scenario is to capture all the victory locations. Its assumed that if you take all the victory locations and the enemy can’t stop you, you’ve won. On the mini map the victory locations are showed by green stars for Americans and grey crosses for Germans. I start out in the lower right corner, and the terrain generally slopes upwards towards the upper left corner. Canuck can set up his defenders anywhere outside of my little starting box, and his troops get pre-dug trenches because he is defending. The main objective in this scenario is to capture all the victory locations. Its assumed that if you take all the victory locations and the enemy can’t stop you, you’ve won. On the mini map the victory locations are showed by green stars for Americans and grey crosses for Germans. I start out in the lower right corner, and the terrain generally slopes upwards towards the upper left corner. Canuck can set up his defenders anywhere outside of my little starting box, and his troops get pre-dug trenches because he is defending.

First contact comes quickly. My troops move out from their initial positions in the open. I send about half of my infantry forward to new covered positions up ahead, letting the other half cover them. Infantry can’t fire worth crap when moving, and when they come under fire they get down and start crawling. If all your guys are moving and come under fire, none of them fires back and they all start crawling slow as hell. Covering fire to suppress the enemy is a necessity. Just as my first wave gets to their next covered position, I send my tanks up to cover them, keeping them slightly behind the front line infantry. This lets my infantry cover the tanks from close threats, and provides the infantry with long range fire when they move again. My tanks are in a little clearing behind my infantry when Canuck calls down his mortar barrage. He only has one, but it’s a good idea to use it early while I’m still relatively bunched up. My infantry hunker down and stay put. My tanks start moving up to get out of the mortar area. I stop them a few hundred yards from where the first round impacted. Unfortunately, I didn’t go quite far enough. The next barrage immobilizes both a Wolverine and a M4A1. 1/3 of my armor force gone within the first minute. This didn’t look good for the home team. I find the unit he was using to spot for the mortar barrage and inflict a little bit of vengeance, but one scout team for two tanks…ugly.
Sieze the Initiative
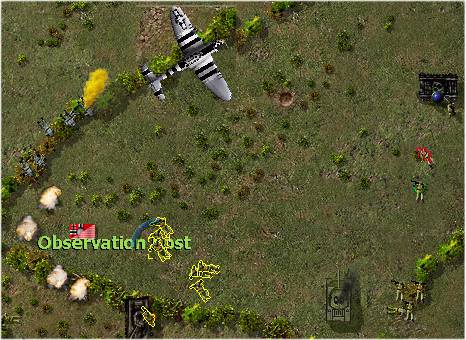
I start pushing to the north over a hedgerow, sending out my other wolverine and a BAR squad, with a command squad for back up. No sooner does the wolverine get over the hedge than it takes a panzerschreck round right in the side armor. Panzerschreck loosely translates as “screw Mark4 where the sun don’t shine”, or “tank killer” for you linguistic scholars out there. The cowardly tank killer crew jump out and run to the nearest hedgerow, then refuse any of my movement commands for the rest of the game. Let me tell you, if I didn’t need to save mortar rounds for use on the Germans… Well, I saw at least two infantry squads hiding in the hegderows across from me. I ordered an engineer squad up to assist the situation, then called in my airstrike. An American bomber screamed overhead, putting the fear of god into those dirty nazis and dropping a few 500 lb bombs. That suppressed the hell out of them for the few seconds I needed to get my infantry into place. I had the command squad hidden behind a burned out tank from some previous battle in the middle of the field, and the rest laying down fire from my hedge. The airstrike had done good work, and the combined crossfire from my infantry was enough to break the weakened enemy resistance.
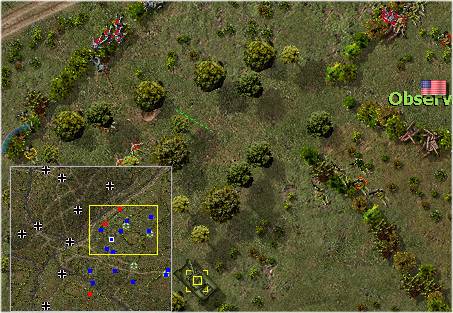
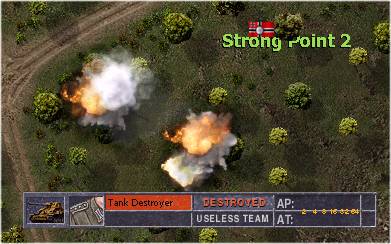
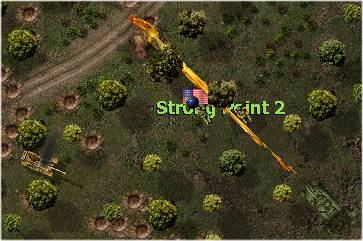
The next obstacle in my bid for victory came as I approached the large river. The remnants of the other infantry had moved back to the hedgerow right before the river, and another squad of grenadiere had been lying in ambush there also. Unfortunately for Canuck, one of my tanks that had been immobilized a screen to the south had a clear line of fire through the trees onto the grenadiere position. I moved my flame tank to get a clear shot, and a BAR used the suppressive fire of the armor to get into position. With the BAR getting close on the left side of the hedge, the enemy was fully suppressed…then the flame tank cut loose. A satisfying “whoosh” filled my speakers, giving me a surge of joy as the tiny screams of the nazis filled my ears. I began to consolidate my victories, moving my troops up all across the map to the river. I encountered a little resistance to the south as a tank and a weakened BAR team found an infantry squad, but a few shots from the tank’s main gun sent the nazi forces scurrying for cover. I continued on and took one of the southern victory locations. Just as I crossed the final hedge by the river with my flame tank, I spotted a Marder tank destroyer on top of the hill. It took a pot shot at the flame tank, which I quickly pulled back under cover. Seeing all the open ground to cover to get near it, I decided to spend my naval gunfire request. Naval gunfire is the hardest hitting indirect fire I had access to….check out the results:
Retain the Initiative
I had almost cleared the southeast part of the map. I found one more squad of infantry holed up near the ford point across the river. My last full strength BAR squad pinned them down with grazing fire to keep them busy, while my M4A1 snuck around to their rear and slapped some hot lovin’ down their flank. Canuck was a wily little bastard though and had put a panzerschreck team down in the bushes right behind his infantry for just this sort of occasion. I quickly popped some smoke grenades after my tank was slightly damaged and retreated, then let the BAR squad clean up. Another infantry squad was in the woods to the south of the original engagement, but they proved little trouble to the combined armor and infantry attack. In addition, to Canuck’s great misfortune, they were in range of one of my disabled tanks. Usually disabled tanks are as useless as SlingsnArrows in a starcraft game, but this time they’ve actually been kicking a little ass for me.
Next on the agenda is moving up the hill. I have basically two battle groups at this point. My flame tank with two depleted BAR squads and an engineer squad are taking the top half. My other tank and a depleted BAR squad are taking the bottom half. I’ve got a few half crushed infantry squads and tank crews lying around, a few disabled tanks, and a mortar squad in the back forty. Canuck managed to sneak a damaged machine gun team and a badly damaged infantry squad around the top of my forces and tried to take one of the victory locations in the rear. I refused to slow the momentum I had gained in my offense and didn’t pull any troops back to deal with it. Instead I dropped some mortar fire on them to slow them down, then watched as my cowardly tank destroyer team actually saved themselves from a post battle flogging by gunning down the enemy with their .45s. Back at the main push I was just about at Hill 140. My BAR scouted ahead, closely backed by the flame tank. I spotted an infantry squad just behind the Hill 140 victory location, but my flame tank reacted as soon as they popped up. It’s christmas time folks. Lets sing that old favorite, “Nazis roasting over an open fire”. Another infantry squad was hiding twenty meters behind that one, but superiority in numbers from the BAR teams and the tank support brought me through without casualties.
Exploit the Initiative
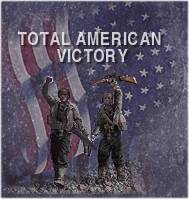
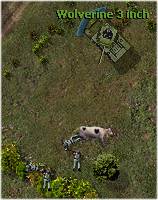 The southern group wasn’t quite as lucky. The BAR took a casualty from the opening shots of an ambush as they approached the victory location. Only the presence of the tank raining down fire right behind them kept the team alive. A second infantry team opened up on my troops, and I had to order the BAR team into a defensive posture while I let the tank slug it out with the infantry. Eventually, after a minute of fire, one of the infantry squads was eliminated and the other surrendered. It was a good thing Canuck didn’t have any anti tank assets left… Well, that’s not entirely true. In a final bid for to be as annoying as possible, Canuck had found an infantry squad in the south and brought it into play against one of my victory locations. I had no fear, seeing as how a disabled wolverine was in overwatch. In amazed disbelief, I saw the wolverine die to a RPG shot, while the crew ran for cover. Still, time was running out for Canuck. I ran over one last infantry squad in the north, and he elected to charge his remaining squad towards my mortar position. I was out of mortar shells, but they still make mortar guys carry rifles. And with that, the game ends in my favor. The southern group wasn’t quite as lucky. The BAR took a casualty from the opening shots of an ambush as they approached the victory location. Only the presence of the tank raining down fire right behind them kept the team alive. A second infantry team opened up on my troops, and I had to order the BAR team into a defensive posture while I let the tank slug it out with the infantry. Eventually, after a minute of fire, one of the infantry squads was eliminated and the other surrendered. It was a good thing Canuck didn’t have any anti tank assets left… Well, that’s not entirely true. In a final bid for to be as annoying as possible, Canuck had found an infantry squad in the south and brought it into play against one of my victory locations. I had no fear, seeing as how a disabled wolverine was in overwatch. In amazed disbelief, I saw the wolverine die to a RPG shot, while the crew ran for cover. Still, time was running out for Canuck. I ran over one last infantry squad in the north, and he elected to charge his remaining squad towards my mortar position. I was out of mortar shells, but they still make mortar guys carry rifles. And with that, the game ends in my favor.
I hope you enjoyed this little presentation on Offense. If you keep the idea of seizing, retaining, and exploiting the initiative in mind when playing most RTS games, you’ll like the results.
Mark4
|
|
|
|
|
 Home
Forum
Starcraft Tournaments
Home
Forum
Starcraft Tournaments
