"wtf i should get hit by a fucking truck"
- Hawk
|
| 2v2 on (Where) Crossroads | | | Author: | | | IP: | usrns80.XXXX | | Date: | 01/12/02 08:01 | | Game Type: | Strifeshadow | | Labels: | Long(1) | | Report Rating: , # of Ratings: 1, Max: 8, Min: 8
Lifetime Rating for Who'sGotLag.IDO: |  |
06
|
Welcome to the intro section. The pictures have been done in a higher compression than I really wanted, but I'm not doing them again. To best view the pictures, keep your face a least 1-2 feet away from the monitor screen. The pictures will look better and you really shouldn't have your head that close to the screen anyway.
This report contains 1.17 MB of pictures to download. This report was made for Internet Explorer 6.0, lower versions of IE and Netscape should be acceptable but may not be. This means that the report was debugged with IE and I don't know how it will react with other Browsers.
In the actual report, there is italicized text. Just think of this text as me, the author, talking to you directly. The players in the game should be referred to in third person. I do this out of convenience because it is easier to mention the information to you directly rather than writing an additional sentence/paragraph. Or it means that I felt chatty at the time and wanted to have a deep soul-searching conversation with you. Don't feel like this has to be a one-way conversation though. Feel free to respond to your monitor and assume that I understand.
There are two animated gifs in this report, but neither are really necessary so they are hyperlinked and will have to be downloaded to view. There are also 2 large collages that have been reduced in size to fit them into the report, feel free to click on them to open a separate full-sized picture of them. Both the gifs and the collages have notes above or below them that identify them as such.
This br was updated on May 23, 2002. Credit/blame for the new format after the majority of the team tags were removed should go to NotDefault.
This battlereport is not on StarCraft as you should have been able to tell from the report color. This report is on a Strifeshadow game and thus you should alter your understanding of the reporting. This game was played on December 20, 2001 so you'll have to excuse our playing somewhat. For a thorough description of Strifeshadow, please click on the link below and read up. |
|

|
|
For those of you who only want a brief and not very descriptive (or accurate) summary of Strifeshadow, read the following. If you know Strifeshadow please skip ahead: |
|
Strifeshadow : A brief overview
Strifeshadow is a real-time strategy game similar to StarCraft, but with streamlined resource gathering and extended combat tactics development. Simply put, resource gathering is automated and you get to fight more and with more control. The types of units fighting and the direction from which they are attacking have important roles. Every unit in the game is separated into a certain type, and each type has advantages and disadvantages against other unit types. Also, attack damage bonuses are given when an enemy unit is attacked from the sides (50%) or back (100%) compared to a straight on face to face battle. Flanking enemy units and protecting your important units is very important and can provide greater benefits. Traps are also available and can be used to great benefit, by damaging and hindering enemy attacks.
Resource System
The main resource of Strifeshadow is aether, which is similar to minerals in StarCraft. All buildings and most units require aether to build. More advanced units require mined ore (think vespene gas from StarCraft) of which there are two types, Ikon and Arikon. Ikon is required for advanced combat units, while Arikon is necessary for air transports, magic users, and certain spells. Both types of ore are refined at a mine, with either or both being produced at a time in several settable proportions (100:0, 75:25, 50:50, 25:75, and 0:100).
To retrieve aether, aether towers must be built next to the aether pools and the aether is transmitted by the tower to the town hall. If towers are out of range of the town hall, additional towers may be built to transfer the aether further. Aether towers can transmit at 100% efficiency for a certain distance, but the efficiency decreases if the towers are further apart or the tower is damaged. All aether pools are drained by the aether towers at the same rate, so any tower that drains more than 1 pool, collects aether that many times faster. Aether is transmitted when at least 50 units of aether have been collected by the transmitting tower and 25 units are sent to the next tower targeted. Any aether that transmits through a lower than 100% efficiency tower loses aether proportional to the loss of efficiency. If aether towers connecting distant aether pools to the town hall are destroyed, aether ceases to be transmitted and the flow of resources stops, although the aether pool towers continue to draw and store aether in them until a maximum internal storage is reached.
As mentioned before, ore is refined at the Mine in several settable proportions, but worker units are required to transfer the refined ore to the town hall. Workers can transfer a large amount of ore and so usually only one worker per mine is needed unless the mine is far away or ore is required quickly.
Unit Types
There are many different unit types, each with their own pros and cons. The category are listed below with their uses:
Worker - Building construction/repair, trap construction/detection/removal (sometimes repairs mechanical units).
Melee - First combat unit, gets up close and personal to attack ground-only, can have engage researched to restrict enemy unit movement when the enemy unit is being attacked.
Archer - Mid-ranged support unit. Typically fires arrows at enemy units while melee or other units are fighting the enemy. Best land-based anti-air unit (that's not a spellcaster).
Strike - Basically a fast melee unit with reduced armor. Used to flank or infiltrate enemy armies and destroy enemy ranged/specialty units.
Skirmisher - Short to mid-ranged support unit specializing in destruction of enemy melee units. Slightly less mobility then strike troops, but with an anti-air attack. Vulnerable to longer ranged units and strike troops.
Short-Range Artillery - Shortest-ranged support unit. Most efficient killer of all units but extremely short range and ground-only attacks are limitations. Usually used to destroy enemy melee units, while friendly melee units use to engage to hold enemies in place/away from the unit.
Artillery (Siege) - Longest ranged, ground-only attack. Vulnerable to attacks close in. Only other unit able to destroy traps (if spotted by Worker) besides the Worker.
Spellcaster - Support unit for casting spells. Must be protected from everything with an attack.
Air Skirmisher - First combat air unit. Primarily an anti-air unit or ground harasser. Vulnerable to anti-air attacks.
Air Siege - Medium to long ranged unit, for heavy attacks/breaking defenses.
Transports - Do I really have to tell you what they do?
The picture that follows summarizes the advantages and disadvantages of each unit type against another unit type in terms of who will win. The picture assumes that all units are identical in number of hit points, that they are fighting one-on-one and face-to-face, they are fighting at their maximum weapon range and that the units can't escape. Units at the base of arrows will defeat units at the head of the arrow. All but the two unit types on the left have no anti-air attacks and are vulnerable to them. Skirmishers are slightly weaker in attack power against Air Skirmishers, but have added hitpoints to counter. Archers are much stronger than Air Skirmishers, but weaker than Air Siege. Spellcasters are vulnerable to anything and everything with an attack unless they have offensive spells. Important: This chart does not take into account unit costs or tech routes.
| .jpg)
Click on the Picture to create a reference window
The Races
There are three races in Strifeshadow, which are different mainly in their basic strategies, the Accursed, the Dark Elves, and the Sylvans. This game is on the demo version of Strifeshadow, so only the Dark Elves were used. For more information, go to the website: Ethermoon Entertainment |
|
Keyword Glossary
For my convenience in the following battlereport, I will be using some terms to identify certain items of importance. The following terms are based on aether transmission in the resource system
Inner Tower - Typically refers to any tower directly transmitting aether to the town hall, usually one of the towers which is also transmitting aether from distant aether towers. It can also refer to any tower near the town hall or on the town hall's plateau, which is easily defended or requires specialized units (air/siege/transports/spells) to reach.
Pivot Tower - Typically any tower just outside the inner tower range (can be inside), usually where two or more aether tower chains merge before entering the inner tower range. If the tower chains merge farther away from the town hall, it can be any tower along the single aether tower chain which connects to inner towers. Analogy: Think of a tree, where leaves collect energy and send the raw energy to a storage unit in the trunk. There are only a few large branches extending from the trunk and each of these branches have smaller branches or twigs with leaves on them, some more than others. The energy has to pass from the leaves to the smaller branches and then to the larger branches to the trunk. If you break the connection (i.e. kill ONE tower) on one of the largest branches, all of the leaves further along the branch cease transmitting and are effectively dead until they are reconnected. (Obviously this analogy has no basis in fact about the actual internal workings of a tree) |
|
The Map
This game was played on Crossroads, a 4-player map with each start at the four corners of the map. The map can be used for 2v2 action with one team on the top of the map and the other team on the bottom. Each start is on a plateau with a single ramp and has 4 aether pool clusters (one 3 pool, one 2 pool, and two 1 pool clusters) as well as one Mine. There is a 2 pool cluster just outside the ramp area and more aether pools toward the center area between the left and right starts of the map. There are also two rich 3-pool clusters on the 3 and 9 o'clock portions of the map. Extra Mines are also scattered around the map, one near each of the starts, another near the 3 and 9 clusters, and 2 in the center of the map.
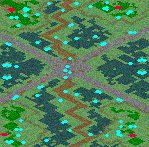
Unimportant map imbalance complaints (has no bearing on the battlereport)
Skip ahead?
In my personal opinion, the map is slightly unbalanced with the bottom-left start being the best, the top-right being the worst start, and the other two being in-between. The bottom two starts can have their pivot towers inside their inner tower range at no extra cost and their enemy's units are exposed to ranged fire longer when trying to come up the ramp. The two starts on the left side of the map can reach the rich resource nodes (two 3 pool clusters) on the left of the map with only two transmission-only towers (at 100% transmission), in comparison the right side starts needs three transmission-only towers.
As to the opinion that the top-right start is the worst start, after including the problems above, it also has the problems follow:
- One of the inner towers transmits at 99% at best (Whoa!).
- [Nevermind, with precise tower placement it is possible] From the gimme (easily usable) 2 pool cluster outside the plateau, two transmission-only towers (at 100% transmission) are required to connect to the next closest tower toward the center of the map, in comparison to the other starts which need just one.
- The top-right also has the shortest base depth (ramp to town hall) of all the starts. This means that any raid force that penetrates the ramp defenses, almost immediately runs into the "real" inner towers and can do severe damage to them. |
|
Enough of that! Onto the Game!
2v2 on (Where?) Crossroads
Obviously from the title this is a 2v2 on Crossroads. The players are Tonderski  (top-left) and Rezyk (top-right) versus AlienatedX (top-left) and Rezyk (top-right) versus AlienatedX  (bottom-left) and zip_disk (bottom-right). The minimap below should indicate the locations. (bottom-left) and zip_disk (bottom-right). The minimap below should indicate the locations.
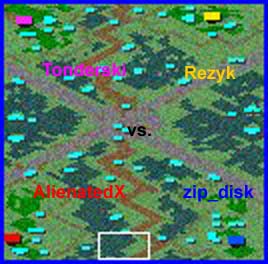
Early Game
At the beginning of the game, each player has 2-3 workers and enough aether to construct 3 aether towers. Each race starts with a different amount of aether to balance the game and Accursed and Sylvans only have 2 workers when they start, but this is a demo game and all four of the players can only use Dark Elves (DE). The safest build order is to construct 3 towers and then produce a Carver (DE melee unit) from the Outpost (town hall). Since travel time is involved in any map, Ethermoon suggests a 4-tower build before the training of the first Carver, which is more beneficial and still provides raid defense.
Since this was a 2v2 game with double rushing probable, Tonderski (1), Rezyk (1), and zip_disk (2) opted for a 4-tower build (using all the inner tower pools) before training their first Carver (Would let them drain 7 aether pools) . AlienatedX (2) chose to go with a powering 6 tower build, building his 4 inner towers and then grabbing the 2 pool cluster outside his base using a transmission-only tower to connect before training his first Carver (melee combat unit, first available combat unit).
Scouting
Rezyk (1) and zip_disk (2) scouted each other with one of their Kobolds (DE worker unit) after their initial 3 towers were built, but zip_disk's (2) Kobold departed late and pondered Rezyk's (1) build order too long allowing the first Carver to catch him. The Kobold lived long enough to reach home but was killed in front of the base's Workshop (basic combat unit producer). zip_disk's (2) Carver attempted to finish off the enemy Carver that had killed his Kobold with one of AlienatedX's (2) Carvers, but was killed when the escaping Carver reached 2 more reinforcing enemy Carvers.
(The previous occurred simultaneously as the diverging build orders below)
Construction/Tech/Strategy Update! (3:30)
Tonderski laid traps around his exposed future outer 2-pool aether tower location and ramp while constructing his workshop and a few Carvers, before expanding to the trap protected aether pools.
Rezyk went for an early rush/harass strategy and constructed a workshop after his first Carver and quickly pumped out Carvers and an early Mine.
AlienatedX constructed a Workshop and Carver before expanding more towards the center of the map, letting him drain 11 aether pools.
zip_disk's went also constructed a workshop and produced 2 more Carvers before expanding outside to the 2 pool cluster.
End Update!
"This is the Border, Stay on Your Side! Ow! Cheater!"
Rezyk (1) sent his three Carver attack force at zip_disk (2) again and skirmished against the smaller 2 Carver group. zip_disk (2) retreated with no losses from the mid-point between the two bases.
"Red Clashes with our Uniforms. Kill Them!"
When Tonderski (1) had 3 Carvers ready, he headed south across the map to strike at AlienatedX (2) . When the 3 Carvers reached the base, he scouted the outer towers before striking at the pivot tower. AlienatedX (2) had trained 3 Carvers by this time and was able to kill 2 Carvers but they were unable to stop Tonderski (1) from destroying the tower. With the destruction of the tower, 4 aether pools ceased transmitting and AlienatedX's (2) powering was halted temporarily.

Rezyk (1) sent his 3 Carver group at AlienatedX's (2) base with 2 more Carvers further behind. While Tonderski's (1) remaining Carver fled from the battle with red Carvers in pursuit, Rezyk's (1) 3 carvers struck at a disconnected aether tower draining 2 pools. The 3 Carvers attacked for a little while before circling around to attack a snoozing Kobold lying next to it. zip_disk's (2) 3 Carver group trotted off to aid his now injured partner arguing whether the "Copper-top" really is the longest-lasting battery. (They use battery-powered weapons. Funny, Yes? ...No? Moving on...)
AlienatedX's (2) 3 Carvers headed back and attacked Rezyk's (1) 3 Carvers before the Kobold was killed. The Carvers withdrew as they were sandwiched between AlienatedX's (2) 3 Carvers and zip_disk's (2) now 4 Carver group losing 1 Carver which had been injured while skirmishing with earlier. Rezyk's (1) 2 Carver reinforcements arrived, but the 4 Carvers were still outnumbered and retreated (No Engage yet, so was easy to retreat).
Construction/Tech/Strategy Update! (5:30)
Tonderski (1) and zip_disk's (2) have been building aether towers to match AlienatedX's (2) level of expansion.
Tonderski has been mining for a minute and just completed his Moag Pens (produces Moags, DE strike troops).
zip_disk upgraded Capacity (2 Carvers trained at the same time instead of one) at his Workshop and was planning to mass Carvers and was just constructing a mine.
Rezyk had gotten a mine earliest and was producing Carvers from both his Workshop and Outpost (Town Hall) and started researching Engage (Special ability of the Carver, slows down an attacked unit's speed for a short while preventing it's escape, useful for both offense and defense).
AlienatedX used his early money to also upgrade capacity at his Workshop, started mining for over a minute, place a Turret (DE static defense building) near his pivot tower and still have a decent, though small, Carver force.
End Update!
"For the Tower!"
followed Rezyk's (1) 4 Carver group back toward his base, but due to miscommunication, one group retreated while the other attacked. zip_disk (2) attacked Rezyk's (1) now 5 Carver group first when, AlienatedX (2) withdrew. Both sides lost 1 Carver before zip_disk (2) pulled back. As zip_disk (2) withdrew, Rezyk's (1) group received a replacement Carver and AlienatedX (2) headed into battle. AlienatedX's (2) group ran into Tonderski's (1) 3 Carver force moving to aid his ally. The two evenly matched groups fought for a bit until Rezyk's (1) 5 Carver group entered the battle. AlienatedX's (2) Carvers retreated after losing 1 Carver and killing 1 of Tonderski's (1) Carvers.

"The Tower Was Ugly Anyway! Retreat!"
Rezyk's (1) 5 Carver group followed AlienatedX's (2) 2 Carvers back to their base, while Tonderski (1) pulled his troops back and zip_disk (2) sent his Carvers to aid AlienatedX (2).
Rezyk's (1) 5 Carver group killed 1 of AlienatedX's (2) Carvers before attempting to raze an aether tower. zip_disk's (2) 4 Carver group attacked them from the back and Rezyk's (1) 5 Carvers regrouped and counterattacked as AlienatedX's (2) 3 Carver group came in. AlienatedX's (2) Turret came online and forced Rezyk (1) to retreat out of range.
Gremlin #1: "I Just Figured Something Out! Bullets Hurt!"
Rest of Gremlins: "Ooh! That Makes Sense!"
Just out of range of the Turret, all 4 players committed their Carver groups to battle. The battle quickly separated into 2 side-by-side 1v1 battles. Tonderski's (1) 3 Carvers attempted to flank AlienatedX's (2) Carvers and were countered by zip_disk's (2) 4 Carver group. Rezyk (1) had the largest number of Carvers (with 5 and 2 more en route) and tried to steamroll over AlienatedX's (2) 3 Carvers. would try to retreat into Turret range and would pull back if they got in range.
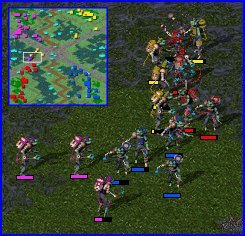
AlienatedX's (2) 3 Carvers killed 2 of Rezyk's (1) injured Carvers before the reinforcing 2 arrived at the cost of one Carver. zip_disk's (2) 4 Carver group fought on as AlienatedX (2) pulled back luring 1 of Tonderski's (1) 2 remaining Carvers into Turret range and his death. zip_disk's (2) Carver group was wiped out, after being encircled which prevented them from escaping into Turret range. AlienatedX's (2) Carvers remained in Turret range, while Rezyk's (1) 5 Carvers attempted to tempt them out. After a few attempts to draw them out failed, Rezyk (1) attacked AlienatedX's (2) 4 Carvers just in range of the Turret and redirected 2 more replacement Carvers coming from his base to probe zip_disk's (2) base.
"Bullets Hurt, Let's Try Somewhere Easier"
Rezyk (1) lost 3 Carvers in the attack on AlienatedX (2) and pulled out his remaining 2 Carvers. The 2 Carvers that probed zip_disk's (2) base ran into a defending Turret, but discovered that one aether tower was outside of it's coverage. The 2 probing Carvers were joined by the 2 retreating Carvers and attacked the exposed tower. zip_disk (2) attempted to distract the raiding Carvers, but had to withdraw when his Carvers came under attack. Rezyk (1) destroyed the tower and lost 1 Carver during the skirmish that followed before retreating from 10 Carvers from .
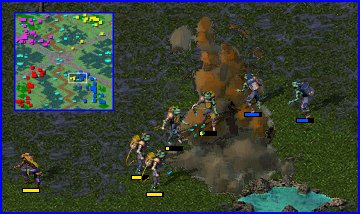
"For the Second Tower!"
followed Rezyk's (1) Carvers and AlienatedX (2) found and destroyed an unconnected aether tower. zip_disk's (2) 3 Carvers, 2 were badly injured, were lagging behind his partner and while following one of the roads (that gives the map it's name), were overtaken by 2 of Tonderski's (1) Moags (Strike units: fast, lightly armored units). The 2 injured Carvers were killed first and then one of the Moags attacked the remaining Carver from the rear, annihilating zip_disk's (2) attack force.
AlienatedX's (2) 7 Carvers, of which half were injured, were surrounded by 6 of Rezyk's (1) Carvers from the north and 3 Moags and 3 Carvers of Tonderski's (1) from the south. 6 of the 7 Carvers were killed taking 1 Moag and 1 Carver with them, although the arrival of 2 of zip_disk's (2) Carvers (which couldn't escape Engage and Moags) allowed the 7th to escape. lost 11 Carvers in the attack and only managed to destroy one unconnected aether tower, 1 Moag, and 1 Carver.
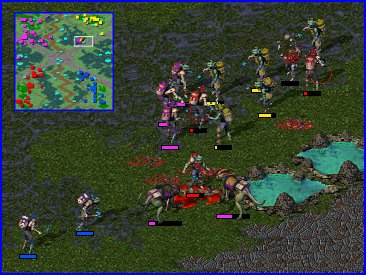
Construction/Tech/Strategy Update! (9:00)
Tonderski has finished researching Capacity for his Moag Pens (2 Moags can be trained at the same time) and Saddle Moags (for Moag Raiders) and created his first Moag Raider (DE Skirmisher unit, combination of Moag and Carver which specializes in killing melee units such as Carvers). He is also continuing to expand his aether tower network, both toward the center as well as toward the rich clusters of the left side of the map. Although he has the largest aether tower network, poor transmission efficiency is reducing his economic advantage (A proportion of some of the aether he's collecting is being lost through the shipping process).
Rezyk has recently completed his Gremlin Furnace and has ordered the construction of 2 Gremlin Grenadiers (DE Artillery unit: decently ranged artillery unit, but main benefit is it's incendiary attack which does heavy splash damage). He also still has the smallest aether network of all the players. The Workshop's Capacity was upgraded recently to improve troop training
AlienatedX has finished construction of a Moag Pens and is researching Moag Saddles while training his first Moag. He is also expanding toward the left-side resource clusters.
zip_disk's has a Stockhouse under construction to produce Marksman (DE archer unit).
Both of 's players have double upgraded Workshops (3 units trained at a time) and are able to rapidly replace casualties of battles.
End Update!
Mid-Game
With the acquisition of more advanced units, the game moves into the next phase.
"We Still Hate Red!"
Rezyk (1) sent his injured Carver force of 5 toward AlienatedX's (2) base and encountered 4 freshly trained Carvers. 1 badly injured Carver died almost immediately and Rezyk (1) called for help. Tonderski (1) sent his 2 Moag and 3 Carver group to assist, while his Moag Raider attacked AlienatedX's (2) Kobolds constructing towers on the left side of the map. 2 more of AlienatedX's (2) Carvers came out of the base, with 1 flanking the enemy line and the other countering an enemy flanker. Tonderski's (1) 2 Moags arrived and helped to encircle AlienatedX's (2) Carvers, while half a screen away, his Carvers moved to intercept zip_disk's (2) 3 Carver support group.

Rezyk's (1) badly injured Carver force and Tonderski's (1) 2 injured Moags were not strong enough and were wiped out with only 1 Carver lost by AlienatedX (2).
zip_disk's (2) Carver group was losing slightly when the battle expanded. 2 reinforcing Carvers arrived and were gaining the lead, when 2 Carvers of Rezyk's (1) and then another Carver from zip_disk (2) arrived. The battle ended when zip_disk (2) withdrew his 3 surviving Carvers after killing all 3 of Tonderski's (1) Carvers.
"Death to Purple!"
AlienatedX (2) supplemented his surviving Carvers and sent 6 Carvers and 1 Moag at Tonderski's (1) base. Tonderski's (1) defense force of 3 Moags and 3 Carvers countered the attacking force and killed 4 Carvers and the Moag at a cost of 1 Carver and a bloodied force. He then chased after the retreating Carvers but stopped to destroy 2 incomplete towers and 1 Kobold that was disabling traps on the left side. Meanwhile, Rezyk's (1) 2 Carvers had followed zip_disk's (2) Carvers into Turret range and were killed.
AlienatedX (2) formed a new attack group of 2 Carvers and 1 Moag Raider and headed toward Tonderski's (1) base with 7 of zip_disk's (2) Carvers following behind. Tonderski (1) countered the attack with his nearby forces of 3 Moags and 3 Carvers. AlienatedX's (2) 2 Carvers successfully screened the Moag Raider from attack, allowing the Raider to snipe unhindered. zip_disk's (2) Carvers came from behind and attacked Tonderski's (1) forces, but took hits from one of Rezyk's (1) Grenadiers which had finally arrived. Tonderski (1) lost 2 Moags and 3 Carvers while killing 1 of zip_disk's (2) Carvers and both of AlienatedX's (2) Carvers.
Tonderski (1) attacked again with 2 new Moags and a Carver. The three units delayed the attacking units allowing Rezyk's (1) Grenadier to get in some more shots. zip_disk (2) lost 4 Carvers before the delaying force was overrun and the Grenadier retreated to Tonderski's (1) Turret near his pivot tower.
chased after the Grenadier with zip_disk's (2) 3 remaining Carvers and AlienatedX's (2) 2 Carvers and 1 Moag (Raider dismounted into Carver + Moag). attempted to protect the Grenadier with Tonderski's (1) Turret and one of Rezyk's (1) Carvers. The Turret and Carver managed to kill all of zip_disk's Carvers, but AlienatedX's (1) units killed the Grenadier and Carver before dying.

Near the center of the map, reinforcing troops from AlienatedX (2) and Rezyk (1) fought for little benefit.
Construction/Tech/Strategy Update! (12:00)
Tonderski has secured one of the left-side clusters and is trying to take the other. Although he has the largest aether tower network, poor transmission efficiency is still reducing his economic advantage.
Rezyk has expanded his aether tower network to equal the size of the other players but poor transmission efficiency is reducing his resource flow.
AlienatedX is producing troops from both his Workshops and Moag Pens which have both been upgraded to max capacity.
zip_disk's Stockhouse is complete and is producing Marksmen and is also constructing another Workshop to increase unit production.
End Update!
"We Really Hate Red!"
again tried to push into AlienatedX's (2) base with Rezyk (1) supplying 1 Carver and 1 Grenadier and Tonderski (1) attempting to screen with 2 Moags and 1 Carver. AlienatedX (2) effectively used the advantage of his Moags to pass around the screening troops and directly target the Grenadier. With the Grenadier destroyed, AlienatedX's (2) 3 Moags and 3 Carvers overwhelmed the remaining troops as well as 1 reinforcing Carver, losing 2 Moags and a Carver.

Click on pic for animated gif (253 KB)
"Sh*t! Don't Follow the Moags Too Closely!"
(12:48) took advantage of the depleted numbers of and pushed into Tonderski's (1) sparsely defended base. 2 Moags and 1 Carver from Tonderski (1), which were to aid the massacred attack force, ran into zip_disk's (2) group of 4 Carvers and 4 Marksmen. Soon after the troops were engaged in battle, AlienatedX's (2) 2 Moags and 2 Carvers came in and another of Rezyk's (1) Grenadiers began firing into the melee. Tonderski's (1) forces were quickly run over by superior numbers and being on the wrong side of a unit type battle (Melee > Strike, remember?).
(13:07) immediately charged at the Grenadier firing at them and started receiving fire not only from the Grenadier, but also from the Turret it was sheltering next to and another approaching Grenadier. After the initial Grenadier was killed by AlienatedX's (2) Moag and 2 Carvers, all 4 Carvers from zip_disk (2) dashed over to the other Grenadier. Rezyk's(1) Grenadier targeted zip_disk's (2) Marksmen firing at the Turret and killed two before it was destroyed. AlienatedX (2) lost 1 Carver, but received 2 more replacements. 1 Moag Raider was formed, changing his group composition to consist of 1 Moag Raider and 2 Carvers
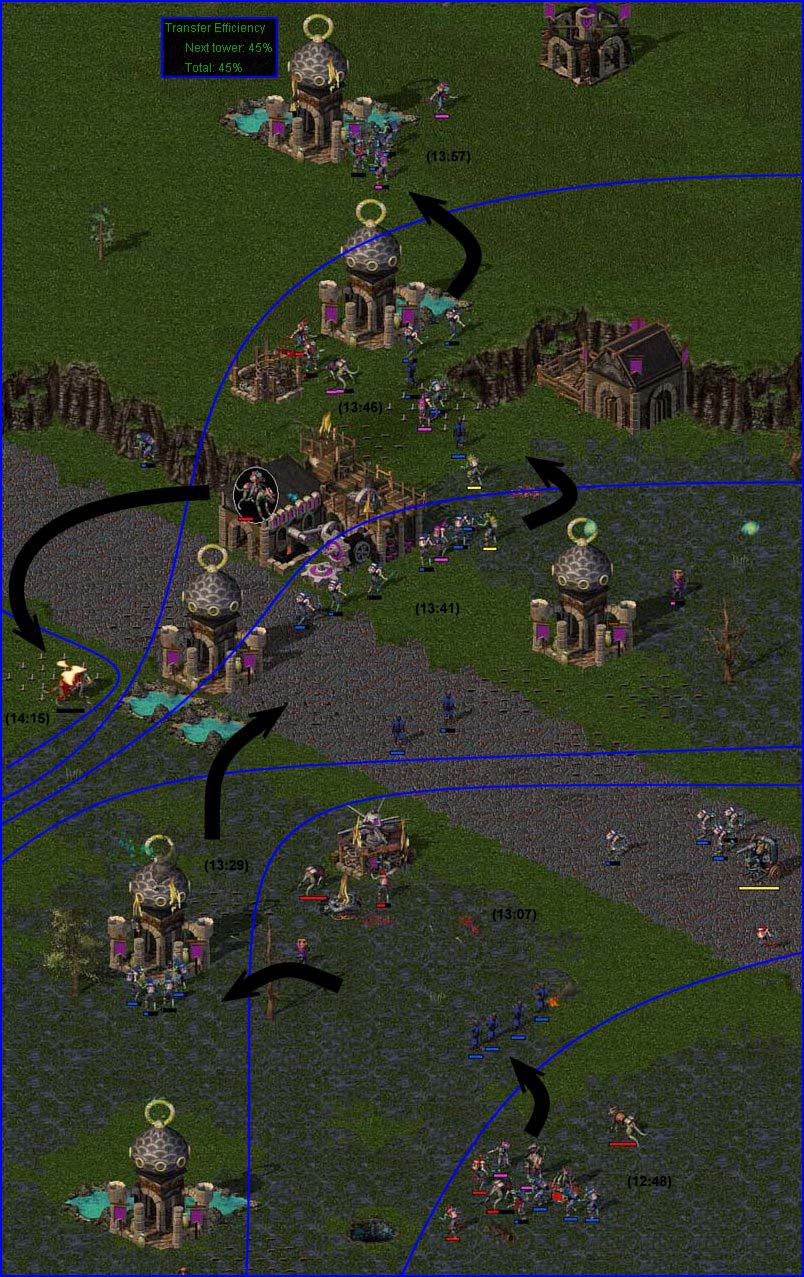
(13:29) zip_disk (2) razed a connecting aether tower, disconnecting the rich left-side towers from Tonderski's (1) Outpost.
(13:41) AlienatedX (2) paused to kill a freshly produced Carver of Tonderski's (1) before calling for an attack on the inner towers and heading up Tonderski's (1) ramp. zip_disk's (2) attack force, after receiving two more Carvers, headed up the ramp toward the inner towers, but finding the route obstructed, split-up to try and find different routes to get up the ramp. The supplemented force now had 6 Carvers and 2 Marksmen trying to rush up the ramp.
(13:46) AlienatedX (2) found a Kobold constructing a Turret on the top of the ramp and targeted the Kobold, killing it before the Turret finished. 3 of zip_disk's (2) Carvers made it safely up the ramp as Rezyk's (1) and Tonderski's (1) Carvers engaged the following troops preventing their escape. The Carvers engaged the Marksmen heading up the ramp, who couldn't get clear of the spike trap there and were killed by the trap. Two of Rezyk's (1) Grenadiers had also arrived and were incinerating any unit they could reach. Two of zip_disk's (2) Carvers tried to get up the ramp after finding it blocked the first time and were also engaged by 's Carvers. The 2 Grenadiers proceeded to burn all of the Carvers, with 's Carvers taking a little more damage, dying before they could break free again. zip_disk's (2) 3 Carvers that had already made it into the base attacked Tonderski's (1) critical inner tower and reduced it to 45% transmission efficiency before dying.
(14:15) AlienatedX's (2) last unit, a Raider attempted to demolish Tonderski's (1) pivot tower, but was badly injured by a Grenadier shell before stepping on the spike trap that killed him.
Click on the pic below to open it to full size
(Don't worry, if you can see the pic, you already downloaded it)
Construction/Tech/Strategy Update! (14:15)
Tonderski has taken major damage from the assault on his base. He lost 1/3 of his pools when the left-side pools were disconnected and the attack on his critical inner tower has reduced efficiency to 45%. Coupled with his previously poor efficiency, 7 of his remaining 11 pools are transmitting at 31% and below, 2 more at transmitting at 45%, and only one was going at 100%. The good news for him is that he still has a decent sized army and enough aether to repair his tower network.
Rezyk is currently extending his aether tower network further, by trying to tap the rich right-side aether pool clusters, while producing Carvers and Grenadiers as fast as his double upgraded Workshop will let him.
AlienatedX is continuing with his previous strategy of Carvers and Moags and has some Moag Raiders ready while training more troops.
zip_disk's has constructed a Dark Elven Conclave (for spellcasters) and an Arcane Catacombs (for advanced spells). 2 Cabalists (DE spellcaster used to summon DE transports, Air Skirmishers, and Air Siege units) have been summoned and were waiting for resources to start summoning Chaos Elementals (DE Air Skirmishers).
End Update!
Late Game
"There's Another Player Besides Red? Where?"
sought to exploit the weakness of after it's recent attack and began massing troops above AlienatedX's (2) base near a Turret of Tonderski's (2) that was protecting his left-side aether towers. 3 of Rezyk's (1) Carvers probed the defenses and pulled back after receiving fire from AlienatedX's (2) Turret.
AlienatedX (2) scouted with a Moag to see the size/location of any army nearby and discovered Tonderski's (1) Turret. AlienatedX (2) sent 4 Moags and 3 Carvers at the Turret, but was hindered from fully using his troops by spike traps (damage-dealing traps that are hidden until tripped the first time). Rezyk (1) and Tonderski (1) repositioned their troops to try and aid the beleaguered Turret. AlienatedX (2) lost 2 Moags and 1 Carver before the Turret was destroyed.
When the Turret was destroyed, the melee separated into several smaller battles. One of AlienatedX's (2) Moag rushed Rezyk's (1) 2 Grenadiers (came down from Tonderski's (1) base after raid) but was hit by some shells and died on a spike trap. [The following is pictured below] Three of Rezyk's (1) Carvers got involved in a small battle with two of AlienatedX's (2) Carvers which had survived attacking the Turret and both sides were being hit by Grenadier fire (off screen to the left of pic below). One of Rezyk's (1) reinforcing Carvers coming from the east charged in and began attacking AlienatedX's (2) Turret by himself. Between the two battles, 3 of Tonderski's (1) Carvers which were protecting a Moag Raider fought 1 of zip_disk's (2) Carvers. Nearby, the other 1 of Rezyk's (1) reinforcing Carvers was fighting another one of zip_disk's (2) Carvers.

The multiple small battles ended with nothing important happening, and the surviving troops committed to one major battle. One of Rezyk's (1) Carvers and 3 of Tonderski's (1) Carvers screened Tonderski's (1) lone Raider and 2 of Rezyk's (1) Grenadiers half a screen away. They faced 3 Carvers and 1 Moag of AlienatedX's (2) and 3 of zip_disk's (2) Carvers.
's screening Carvers tried, but were unable to stop 's Carvers long enough for the Raider to make a significant difference. The Raider was swarmed by 's remaining Carvers and received Grenadier splash damage from support fire. With the Raider's body beneath their boots, 's 3 surviving, blood-soaked Carvers charged at Rezyk's (1) 2 Grenadiers and 1 almost dead Carver. The Carver delayed the attacking Carvers long enough for 1 more Grenadier salvo to hit causing severe damage to two of the Carvers. Though courageous, the three Carvers were killed by a spike trap and 2 "sniping" Grenadier shots, before they could kill the Grenadiers. Unfortunately for Rezyk (1) , the splash from the "sniper" shots of 1 Grenadier killed the other engaged Grenadier (Every Gremlin for himself). The lone surviving unit of the battles was the Grenadier (with only 8 hitpoints), but no significant damage had been done to AlienatedX's (2) base.
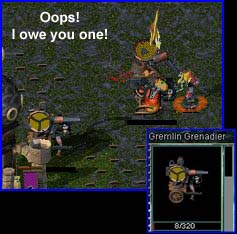
More troops were sent from all players to the rally points of the previous battle. had 3 Carvers and 2 Moags to defend AlienatedX's (2) base and had gathered 4 Carvers, 1 Raider, and 1 Grenadier when the following words flashed across 's screens:

Construction/Tech/Strategy Update! (16:00)
Tonderski has repaired most of the damage to his aether network and has added another aether pool, making it 16 aether pools he's drawing from now. His still bad pivot tower placement (or rather lack of one) is still reducing his aether flow lessening the benefits of his pool advantage.
Rezyk has linked up his aether tower on the right side and is currently drawing from 12 aether pools. Poor transmitting efficiency is hampering his resource gathering though, with the right side's (3 pools) total transmission efficiency at 48%. He has not taken the second 3-pool cluster on the right side yet, but will soon.
AlienatedX is still producing Carvers and Moags, though with a higher proportion of Moags than before. He is also preparing to expand his tower network which is draining 9 pools.
zip_disk's has 2 Cabalists creating Chaos Elementals while creating pure Carvers for defense. He is currently expanding his aether network, but is draining only 9 pools at this time.
End Update!
'How To Be An Annoying Guest Rule Book'
Rule 1: Always Show Up When Uninvited and When Your Host Unprepared.
Rule 2: Break Things, Preferably Important Stuff.
Rule 3: Disappear Before You Can Be Made To Take Responsibility For Your Actions
Rule 4: Repeat Previous Steps
All four of zip_disk's (2) Chaos Elementals (Air Skirmisher: fast, airborne raiders/anti-air interceptors with strong anti-air and weak air-to-ground attacks) were streaking across the map to aid AlienatedX (2) when AlienatedX (2) called for a strike against 's inner towers. The 4 Chaos Elementals swerved toward Tonderski's (1) base when they were redirected again, north this time after zip_disk (2) remembered an incomplete Turret that was being constructed on Tonderski's (1) ramp during the assault there.
Rezyk (1) ordered a quick probe on AlienatedX (2) by three Carvers but retreated after taking Turret fire and seeing 2 of zip_disk's (2) Carvers. 1 of the unattended Carvers followed the retreating enemy and basically had bad things happen to him.
AlienatedX (2) sent his mobile forces of 2 Moags and 3 Carvers at the massing troops, with the strike troops specifically targeted at the lone Grenadier. 's Carvers were attempting to engage the Moags when AlienatedX's (2) 3 Carvers arrived and went at Tonderski's (1) lone Raider. With the Grenadier destroyed, the lone surviving Moag escaped the Carvers by circling around the troops engaged in battle before attacking the Raider from the side. When the Raider was killed, the remnants of AlienatedX's (2) force withdrew with in pursuit until reaching fresh reinforcements. retreated from the now larger force and headed towards 2 of Rezyk's (1) incoming Grenadiers.

Click on pic for animated gif (1.11 MB)
During the above battle, zip_disk's (2) Chaos Elementals arrived in Tonderski's (1) base and began attacking his critical inner tower. The tower was almost completely destroyed when 2 Moag Raiders showed up and tried to distract the Elementals (The Moag Raiders were created from 2 Moags intended as reinforcements for the above battle). After the tower was destroyed, the Elementals took some shots at nearby buildings before fleeing toward Rezyk's (1) base. Tonderski (1) began construction of a Stockhouse near his ramp Turret and left both Raiders at his Outpost for defense. The damage done was minor because the critical tower was rebuilt soon after the Elementals were chased off, but combat units were now assigned to babysit the base preventing a large attack force from being built.

At the battle near his base, AlienatedX (2) followed Rezyk's (1) running Carvers north when the 4 Carvers turned to engage. The 2 Grenadiers' shells began exploding in the melee and both of AlienatedX's (2) Moags died under the attacks. zip_disk's (2) supporting group of 3 Carvers arrived soon after, causing Rezyk's (1) Carvers to be overwhelmed by 's superior numbers, but the damage from the Grenadiers was high. 3 of 's Carvers survived the Carver engagement when 2 of Tonderski's (1) Moags cut them off. Grenadier fire again played an important role, heavily damaging the incoming Carvers before the Moags helped finished them off. Two more of zip_disk's (2) Carvers arrived from the Workshops and began fighting the screening Moags, but Tonderski (1) withdrew his badly damaged Moags before they were killed.
Unfortunately for the Grenadiers, the retreat of the Moags left them without a screen. Each of zip_disk's (2) Carvers selected an undefended Grenadier and engaged (causes reduction in attacked unit's speed) them to slow them down, when the 3 other players sent in aid. One of Rezyk's (1) Carvers showed up first to help screen his Grenadiers and Tonderski (1) recommitted his 2 heavily damaged Moags and 1 Carver at the same time AlienatedX's (2) 2 Moags arrived. 's forces quickly killed both of zip_disk's (2) Carvers, but AlienatedX's (2) 2 Moags targeted the Grenadiers, crushing them both quickly before trying to retreat. The escaping Moags had to fight their way out killing 1 of Tonderski's Moags, but 1 of the 2 Moags was caught by another of Tonderski's Moag's engage and was killed.

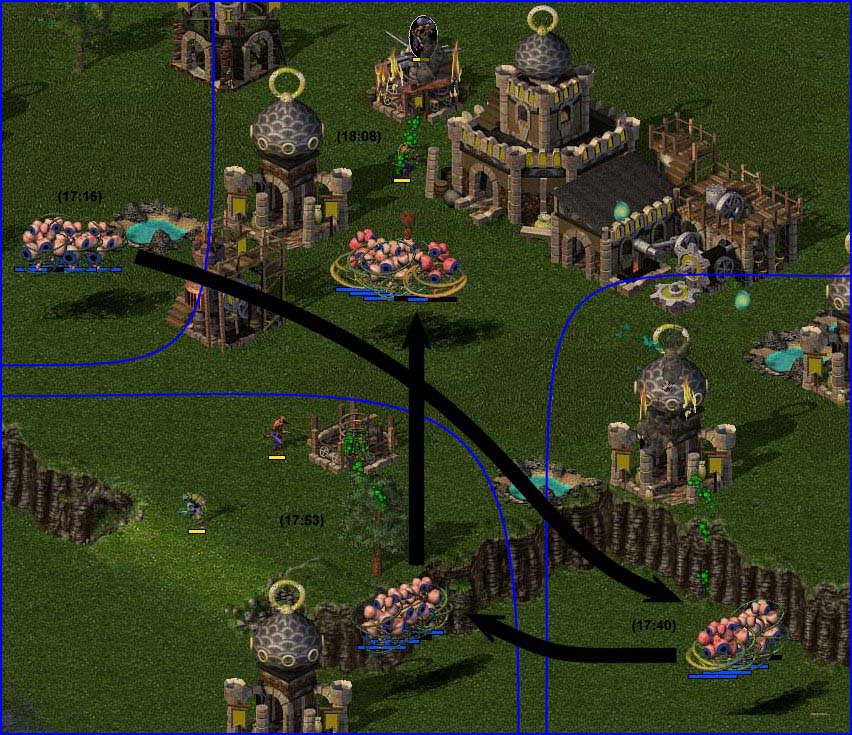
(17:16) During the previous battle, zip_disk's (2) 4 Chaos Elementals flew into Rezyk's (1) base and began firing on his critical inner tower (which was incidentally his pivot tower). Rezyk (1) had earlier responded quickly to the appearance of enemy air units and had started laying down a Stockhouse near a Turret by his outer towers and placed a Turret near his Outpost almost immediately. zip_disk (2) did not react quickly enough to stop the Kobold from finishing the Turret, but the critical tower was not completely protected by the Turret's firing radius.
(17:40) After a position adjustment by the Elementals, the tower was destroyed after Rezyk (1) began construction of another Turret near his ramp.
(17:53) The 4 Chaos Elementals quickly pulverized the constructing building and waited a few seconds for 2 more Elementals to arrive.
(18:08) zip_disk's (2) 6 Chaos Elementals then charged at the lone defending Turret and destroyed it losing 1 Elemental in the battle. The remaining 5 Elementals concentrated their fire on the Outpost and began slowly smashing it down.
Click on the pic below to open it to full size
(Don't worry, if you can see the pic, you already downloaded it)
Also happening during the battle at AlienatedX's (2) base was a small raid at zip_disk's (2) base by Rezyk (1). 1 Grenadier opened fire on one of the outlying aether towers with 1 Carver providing protection. The Grenadier destroyed the Tower and the nearby Turret before 2 freshly trained Carvers overran the vulnerable duo.
"You're Lying! Red Has No Partner! Death To Red!"
again began concentrating troops above AlienatedX's (2) base with Tonderski (1) supplying 2 Moag Raiders, 1 Moag, and 1 Carver. Rezyk (1) supplied 1 Grenadier and 1 barely alive Carver to the assembling army. The accumulating damage on Rezyk (1) and the greatly increasing lag in the game encouraged Tonderski (1) to throw his remaining troops at AlienatedX's (2) Turret. The Turret was supported by 2 of AlienatedX's (2) Moag Raiders which targeted and killed Tonderski's (1) attacking Moag.
Rezyk (1) meanwhile threw his first three Marksmen at zip_disk's (1) Chaos Elementals, killing 1, when 5 of zip_disk's (2) Carvers began assaulting an aether tower connecting his rich right side towers. 2 more Chaos Elementals twirled past over the Carvers heads when resigned from the game.
Post Game
This game was very close at most points of the game in terms of troops, but was building a steady economic advantage throughout the game. The quick strikes at 's resources and AlienatedX's (2) tough defense were extremely important in the outcome of the game. If either of the two had failed to pull their weight, would have been able to overwhelm the poorer .
There were 2 major examples of strikes against 's resources. The first was when the combined forces of rolled into Tonderski's (1) base cutting off some of his resources and preventing him from mass producing troops. The second instance was when zip_disk's (2) Elementals laid in key strikes at 's tower systems, which also prevented mass troop production and forcing tech and strategy changes. Without these 2 strikes, would have likely have easily overcome with sheer weight of numbers.
Not to be underestimated was AlienatedX's (2) tough defense against the combined attacks from . The defending Turret inside his base was the center point in his base defense, but Rezyk's (1) Grenadiers were a powerful counter with their ability to attack from outside the Turret's range. AlienatedX's (2) fast preemptive attacks with Moags/Carvers helped to negate this weapon and keep himself in the game. Without the defense of AlienatedX's (2) base, would have been able to cripple his resource gathering, preventing him from building enough troops to counter any further attacks.
The End
|
|
Download the Demo here!
Click here for the Replay (This is not a version 1.03 file, to view this replay, SS must be started under a file called "Strifeshadow101" or "Strifeshadow102" [I forget which version this is]) |
|
|
Please feel free to leave comments on the comments page about the report. Mention what you liked/didn't like or what you felt was missing. |
|
PS. I suppose I should mention that zip_disk = Who'sGotLag.IDO |
|

|
|
 Home
Forum
Starcraft Tournaments
Home
Forum
Starcraft Tournaments

Demo.jpg)

