"It's entertaining when you win!"
-greyhoundbus
|
| 1v1 on Milton Keynes (Another Laser Squad: Nemesis Report) | | | Author: | | | IP: | usrns17.XXXX | | Date: | 08/28/04 05:08 | | Game Type: | Other | | Labels: | none | | Report Rating: , # of Ratings: 4, Max: 9, Min: 8
Lifetime Rating for Who'sGotLag.IDO: |   |
1v1 on Milton Keynes
|
Boring Introduction
Hello and welcome to yet
another Who'sGotLag.IDO battlereport. This battlereport will be
about a game played on Laser Squad:
Nemesis. You can skip
down to the next paragraph since you will not care about what follows this
sentence. This is report number 15 for me (numerically), BUT in
terms of completed reports, this is number 12. You may ask where are
the other reports and I would say incomplete or haven't started when I got
bored/lazy/busy. (Yup, back to the same old intro format.)
BTW. For those of you who
have web browsers that can't display pictures with brackets or use
Javascript, you're just
outta luck. This battlereport was designed for Internet Explorer
6.0. Recommended minimum screen size: 800x600 pixels.
|
|
First off,
Laser Squad: Nemesis
Laser Squad: Nemesis is a tactical,
turn-based/real-time 1v1 game where battles are played out over 10 second
increments. Translation: Each turn (where orders are given for each)
are 10 seconds long, but the action that occurs is real-time as units
carry out the orders they have been given. The units react to
enemies according to how you plan the orders so be careful. There
are now 4 races in this game that
roughly equal to StarCrafttm races, the Marines (Terran -
Barracks units), Machina (also Terrans but Factory units), Spawn (Zerg),
and finally the Greys (Protoss, high value units but fewer in number).
My LSN race descriptions are
here
with pictures looted from LSNGuide.com,
as well as some of the information is based on their accumulated
knowledge.
I think I did a decent job
of describing how the game works as the report goes on, but I did leave a
lot out. If you want lots of information before the report starts about
the game, the
official players manual is here
A link to try the free
trial version of Laser Squad Nemesis (with short single player campaign) is
available through the picture below. If you do intend to use the
trial version, I recommend that you play the campaign missions first to
help you get a feel for the game. You are only allowed to play 50 rounds
of multiplayer with the trial so don't waste them getting used to the
game. If you do subscribe and are not sure about how you like the game,
remember that you have a 30 day money-back grace period after subscribing:

Quick Intermission
|
New Race: The Greys
This race is much different
from the other races in the game. Unlike the other races who have separate
hit point and ammo capacity, the Greys have only 1 resource called energy,
that can both be used as ammunition and as a shield. Damage done to the unit is first
taken out of the energy stockpile, while weapons also require energy to
fire. If a unit takes enough damage it starts losing its energy
according to the damage it would've taken. When a unit runs out of energy it can no
longer fight, unlike the other races who can still fight despite
being critically
damaged until they are out of ammo. On the other hand this gives Grey units
the effect of being able to absorb significantly more damage when fully
charged, making it more likely that a Grey unit can escape to fight again.
Be aware that changes are still
being made to the Greys and their abilities. The following information is
for version 2-28. The current version of LSN is 3-07 and many things have
changed.
Unit (Point cost)
|
Unit Description
|

Sentry (1) |
In this version the Sentry is
the fastest firing unit in the game. (Version 2.28, changed now) Its
damage output is laughable against armored units but it makes an
excellent scouting unit with lots of energy and good vision. |

Guardian (2) |
This non-combatant vehicle
carries a small area shield/cloaking generator. When the shield is
turned on, units inside the shield and the Guardian are twice as
difficult to spot (Enemies need to be twice as close as normal to
see them).
This shield also absorbs incoming weapons fire/explosions and can bounce
grenades and goo balls away as if it were a wall. Explosions and
weapons fire starting inside the shield act normally however, so if
an enemy unit gets inside the shield... (Minor changes now) |

Psyker (2) |
This unit uses its attack to
"psyke" enemy units for a single turn. Enemy units that
are psyked lose their vision, can't move, and can't shoot. In
addition, the Grey forces gain the units vision until the end of the
turn it is psyked. If the unit dies however, the vision is lost.
(Version 2.28, change now) |

Warp Gunner (3) |
This unit can create warp
implosions anywhere inside its range regardless of terrain between
it and its target. Distance is its friend and enemy however as
further distances cause the implosions to be weaker but an implosion
too close can kill itself. There is no travel time between the unit
and its target other than the aiming time so it can be a very lethal
unit (Version 2.28, changed now). |

Saucer (4) |
This is the largest flying unit
in the game, loaded with lots of energy and fast moving. Its
accuracy is only about average but does decent damage. This
unit can also function as an energy reservoir with other units able
to tap into its batteries to recharge themselves. (Cost and energy
level changed) |

Regenerator (1) |
This unit is also equivalent to
the Headquarters of the Marines and the Machina but it also has a
unique ability. Grey units are able to teleport from one
Regenerator to another for fast movement. |
|
|
The Map
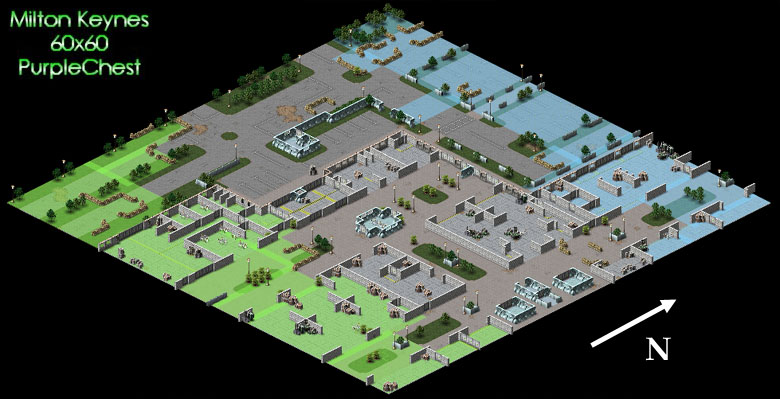
The map this game was played on is called
Milton Keynes. Milton Keynes is supposed to be a shopping mall I
think. The
lower-right (east) edge of the map between the two sides is lined by several
small rooms opening to a north-south walkway where units able to break
walls can stealthily approach. The largest buildings are in the middle
north-south areas, doors are available for stealth approach in the left
central building but not
the right central.
The top-left (west) edge of the map is relatively open allowing clear
vision, but leaving units vulnerable to fire.
|
|
Minimap Key
Yellow Lines/Shapes :
Mark the limits of fire coverage from a given position (where yellow lines converge)
Colored dot : Unit
that will be labeled but larger dots indicate larger units
Red Lines :
Weapons fire
|
|
Pregame
This game was played with version
2.28 data and LSN client. Version 2.28 was the third regular version
including the Grey faction. Subsequent versions since then
have repeatedly and greatly reduced/changed Grey capabilities, energy levels, and unit
costs.
1v1 on
Milton Keynes
This game was between me
and another player in the elite league of LSN, called Alias
since I didn't ask permission to use this game. Currently league play in
LSN is divided into 3 leagues (Rookie, Veteran, and Elite) of which elite
is the highest. In this game I played a more
experienced player who
was also ranked higher than me. Game settings were 20 force points, 30
turns, 30 day time limit, and random races. Since I was the challenger, I
deployed from the north in the blue zone. In
this game I chose to command the rather large-headed Grey faction. My
opponent was known to frequently deploy the Marine faction so I deployed
accordingly but kept in mind the possibility of other races.
I placed my troops as shown
in the picture below. Mouseover the
picture for the gameplan visual aid.
My gameplan for this
game will be to separate my forces into 2 main groups and with the
remainder being spotters. Defending the middle (and center if needed)
would be a Warp Gunner (WG)/Psyker combo. Stealth marching up the east flank
would be another WG and 2 protective Sentries hidden by a Guardian with its cloaking shield. The
Guardian should keep the units from being seen while the wide open spaces
will let my units spot any approaching unit relatively quickly. Providing
vision would be 4 relatively spread out Sentries whose jobs were to watch
for enemy units and allow the WGs and Psykers to attack with impunity.
This plan may be slightly vulnerable to a Spawn rush, but the observing
Sentries should provide some warning of a rush while the Sentries on their
own should be able to kill their own value
in enemy units. The ability of my troops to teleport quickly around
through the Regenerators makes redeploying for a new threat easy. The
reason my western strike force didn't deploy in the west is because they
would've started the first round without their shield on and there was a
slight chance my opponent could've seen the waiting visible units.
Note: In the current
version this strategy would probably result in a quick but violent death
for the Grey faction.
Tactic Box
|
| Guardian
stealth |
A Guardian is a small
treaded vehicle that
carries a cloaking/shield generator. This shield not only protects
itself but nearby units as well. Visibility of units inside the
shield is 50% reduced (enemies have to be twice as close to see
them) |
| Psyker/Warp
Gunner |
When
the units are hidden, Psyker and
WG
attacks are totally untraceable to the firing units
and can fire anywhere in range regardless of terrain. Unfortunately they can't target units and
instead must be fired at areas where hopefully the enemy units
will go/not move from. The Psyker/WG are
a highly
complementary pair, with the Psyker causing an enemy unit to freeze in place
where the WG can blow it to pieces.
This tactic is now not as useful due to a
large number of nerfs to the Grey. Psykers no longer freeze units
but do damage, WG shots are now missile-like and traceable, and
both units cost more now.
|

Shall we begin?
Start: As you can see in the above
picture there are no enemy units visible so the original gameplan is
unaltered.
|
Commander's log
20 Seconds: Arrival
Touchdown on this strange little world
completed. The dirty little natives call it Urth or something.
Base setup completed, as requested by
the troops we setup an outhouse in a clump of trees far away from
the base easily reachable by teleporting. We also have another
Regenerator in a private room in the back where the troops can
"relax" after hours.
For Rest and Recreation my troops are
going to play a little "hide the module", a game we've
been playing with the Urthers for centuries. One
group of the soldiers will find some natives and hide a
sensor-shielded module inside one of them. The remainder of the
guys will have to find the module, but with the sensor-shielding
the probes need to be really close to detect it. They're going to
have to really get their probes in there to be able to get close enough
to detect the module.
The hiding team stopped to use the facilities in the trees
to the west of our base before going to find some natives to use.
Ah, good fun. |
Turn 2
Results: As my troops ran out to
do their assigned mission, most had an uneventful turn. Most not being
all. The western force of 1 Guardian, 2 Sentries, and 1 WG were
stealthily moving toward their spot when a quite literal barrage of fire
came pouring up from the south. Multiple red shots impacted on my
Guardian's shield draining the energy out of it. Marines. Only they used
red-tinged laser weaponry. Before the turn was up the Guardian's shield
was gone and my
7 force point
(fp) attack force was caught in the open.

By the end of the turn my troops had spotted 2
Commanders, 2 Grunts, a Grenadier, and a Sniper moving up while firing
north. Alias
had apparently also been aware of the potential Grey mischief and sprayed
fire northward through the open area.
Some of the shots were likely also meant to converge on the clump of trees
to the where my Regenerator was hidden. Alias
knew that the clump of trees could hide a reserve Headquarters/Regenerator
unfortunately for me.
Plan: With the total failure of the
planned stealth attack I ordered my troops started running for cover. It
would take ~9 seconds to reach the Regenerator where they came from or 6
seconds to run eastward to cover. I chose to run east because I would
pretty much guarantee a loss going the other route and I wanted to see if
I could conceal the existence of the Regen. Also
with the sighting of 12 fp worth of enemy units units in the west, my
entire defense shifted in response. I had my eastern WG/Psyker move to teleport to
the center while my Sentries in the center shifted forward to find where
the weakpoint in the Marine lines to the south. With so many units sighted
elsewhere, there would definitely be a few.
Tactic Box 2
|
|
Spray fire
(Recon by fire) |
This is a common anti-Grey
strategy to prevent cloaked units from sneaking up undetected.
Guardian shields protect as well as cloak, so when a shot hits the
shields it releases its energy. Shots that hit something when
there should be nothing there can reveal the presence of a cloaked
Guardian. This tactic is useful for anti-Greys but reveals
the presence, general location and race of your firing
units. A player must balance the need for security with
concealing their own movements. |
Turn
3
Results: By
the end of the turn I was quite happy. My exposed attack force had made it
safely to cover and I had spotted the majority of Alias's
Marine force standing
around in the west. 3 Commanders, 1 Sniper, 3 Grunts, 2 Medics, and 1
Grenadier (19 of 20 fp, since there should be a hidden HQ nearby) had advanced with most stopping to fire at my
troops. The formation I had run my troops retreat in saved me some grief though. The WG was the most valuable unit
of the assault force so I had the other
units
march between it and the Marines, with a Sentry mirroring its
movements exactly to
shield it with his body. The other troops weaved
slightly and moved behind a tree breaking target lock by some enemies
resulting in only 1 unit taking a hit. If I had chosen the other option at
least 1 of my troops would likely be dead and some others injured.
Since the
majority of Alias's troops were in the
west, the remainder of my troops had an uneventful turn. A Grunt was
visible coming up the central-left building however.

Plan: Time to earn a point. The Grunt in
the central-left building was relatively isolated from the rest of the Marines and
was an ideal target. Both center Sentries were told to try and kill him,
with 1 unit Corner
Dancing
to attract attention while another quietly snuck up (behind cover so the Grunt
likely didn't know he existed) to try to kill it in close combat. The WG from the
west force also was going to make a warp implosion right on top of his
head to further soften up the Grunt. The
remainder of the western force retreated east towards the main base as
fast as they could to recharge their energy. The WG/Psyker team moved
closer to the front lines in the central-right building to await the
incoming Marines. The WG/Psyker's escort Sentry was told to Regen
Pop from the now exposed top Regenerator.
Finally the right side Sentry farthest south charged forward alone to gain
intelligence. The danger was minimal since at most only a 1 fp unit was
defending the area below.
Tactic Box 3
|
| Corner
Dancing |
Corner Dancing is a tactic made
popular by Crank in his Grenadier
Bible. A unit comes around a corner/wall edge and Opportunity
Fires down a
passage/doorway/whatever. With corner dancing a unit
"fires" once then ducks back behind the wall. Enemies
that sight the unit may try to shoot at it, but if the unit is
fast enough it will be behind the wall again before a shot can
reach it. |
| Regen
Popping |
Regen Popping is similar to
both shuttle popping in StarCraft and corner dancing. The
difference is that Regen popping is much more dangerous but
unexpected. Basically
a unit teleports to a Regenerator in an exposed location, fires once, and then
teleports out again. The problem is teleporting
takes time and the unit may be hit
during this period. The farther the Regen is away from the
targets, the safer it is to do (though less effective also)
This tactic is also less useful now that
Sentries take longer to fire.
|
Turn 4
Results: Four seconds into this round the
isolated Grunt fell to the ground dead from unnaturally accurate Sentry
fire and a WG implosion giving me a 1 point lead. The Regen popping Sentry
also managed to hit
Alias's Grenadier doing slight damage
but taking a shot
in return. The Regen itself took heavy damage and looked to die next
round. The Grenadier bounced several grenades behind the wall my troops
were hiding behind caused both west force Sentries to
lose all their energy.

A second Grunt was sighted coming
up the central corridor, he was the lone defender of the entire bottom of
the map. Basically sent to watch the bottom and yell loudly before he
died. Alias
probably had predicted my units' lack of energy and sent the Grunt up to try
and get some easy points but instead ran into my central defense. Plan: The second Grunt was
nearly in range of my WG/Psyker combo so they were assigned to try and
kill him. The 2 Sentries who killed the other Grunt were told to rush the
position once the implosion had gone off. Otherwise the western force, all
but 1 unit out of energy,
were still fleeing home
to recharge. The scouting Sentry in the east continued moving south toward enemy territory. Turn
5
Results: The WG/Psyker combo missed, but
the rushing Sentries managed to hit the Grunt twice. The western force
finally reached a doorway to the main base area, with the Guardian
arriving first. The western Regenerator for some reason has still not been
destroyed. Plan: Everyone but
the 2 pursuing and 1 exploring Sentries stopped at a Regen and started
recharging
their batteries.
Turn 6
Results: All units but the 3 Sentries
were
surrounding a Regenerator and recharging. The pursuing Sentries didn't follow
the Grunt too closely to avoid being ambushed and taking damage. The exploring Sentry reached the
bottom corner of the map, finding nothing as expected. The western
Regenerator surprisingly still has not been destroyed. Plan:
The 2 pursuing and 1 exploring Sentries keep going while most units
recharge. I decided also to be crazy and send my 1/4 recharged Guardian
and some Sentries to snipe from the now critical top Regenerator. The
only vulnerable moment in this plan is if the Regenerator is destroyed
while the Guardian is teleporting and before the Guardian's
shield can cover it.
Turn 7
Results: Everyone who was recharging did
so, the Sentries continued to pursue and explore finding nothing, and my
Guardian appeared alone at the top Regen just as a shot blew the Regen
away. With the Regen dead, the Guardian couldn't teleport away. Even more
alarming was the sight of 2 Grunts who might get close enough to see
through the cloaking shield. With the loss
of the Regenerator, the score is now 1:1. Plan:
Run Guardian, run! The southern Sentries continue to explore while
everyone else recharges or peers out of windows looking for the enemy. 
Turn 8
Results: The Guardian was out
of sight range of the Grunts but that didn't matter when one of them ran
closer and spotted him anyway allowing other units to open fire. After
several shots its shields went down again and his little vehicle had to
run while visible and unprotected from enemy fire. The 3 southern Sentries
kept searching. 
Plan:
Push the pedal to the metal little Guardian, maybe you'll make it back. To
the south, the Sentries kept searching, trying to find the Marine HQ or kill
something. The recharging Sentries
should be topping off their tanks by now and will
start spreading out looking for Marines again.
Turn 9
Results: Alias
moved at least 1 Commander
and began firing at the retreating Guardian who took light damage. To the
south, the Sentries inspected most of the rooms in the buildings and didn't find an HQ
inside. The HQ was either outside in the open where his army was or
concealed a room I didn't want to check because it might reveal my troops
presence. Plan: The
Guardian would be safe next turn if he managed to get inside my base area
next turn. The Sentries in my base would continue to shoot at the
Marine units attacking the Guardian they could see. The 3
Sentries waiting in the southern room of the central-left building would
burst out next turn and let fly tiny blue shots of annoyance on anyone
they spotted. Hopefully they would spot the Marine HQ and blow it to
pieces.
Turn 10
Results: Under heavy fire my Guardian
zipped into the main base area and was almost safe when a powerful red
bolt struck him from the rear blowing the vehicle to pieces. The corner
dancing Sentries in my base kept up a barrage of insignificant fire
hitting the units shooting at my Guardian but doing little
damage. Also visible in the picture
below are holes in the walls as high-power
shots began destroying them. The score
was now 1:3. In
the south my Sentry force opened up the doors guarding the south and
spotted a Grunt aiming back at them. The faster Sentry firing rate was to
my advantage as my units would fire and be behind cover before the Grunt could hit
them. At the end of the turn, the Grunt was injured but still alive and 2 units were visible
nearby which could come to its rescue. 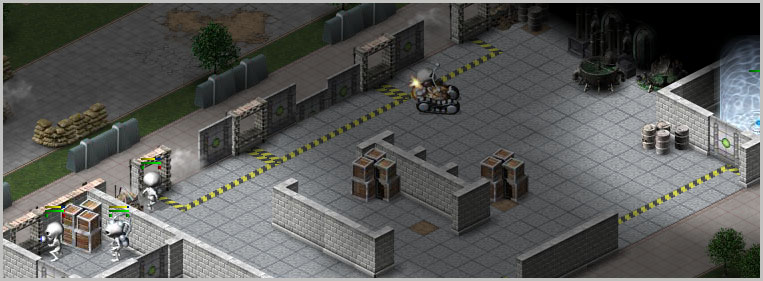
110 Seconds: First Loss
These natives are more hostile than we imagined.
Old Ghlbt almost made it back to base in his little tractor safely
where he could recharge his shields and help us sneak up on the
natives.
The loss of the outhouse didn't matter much but now
the boys are angry. They're talking about using extra large probes
on the next alien they catch. |
Plan: I ordered the 3
Sentries in the south to Red-line
the half-dead Grunt in the south before retreating. Each unit then
op-fired in a different direction to check for enemies before continuing
to flee. With the loss of my
Guardian, I've lost a powerful tool in my arsenal. Now either the Marines
have to come closer to me or my valuable troops will have to expose themselves
when they advance to
get the enemy into range.
| Red-lining is a shorthand for
a common order pattern in LSN. An aimed shot at a target is
indicated by a bright red line and indicates the firing unit will
shoot if it can see the target or skip the order if it can't or
the view is blocked.
Repeated aimed fire by a unit tells it to shoot at
a target until either one of the 2 units are dead or there is no
ammo. Red-Lining means that on almost every step along a route the
unit is taking, it takes several aimed shots at a unit. This is done with step by step movement so if at any point
along a route the target is visible to the shooter, the shooter
will fire. If not then the shooter continues along its route
without stopping. |
Turn 11
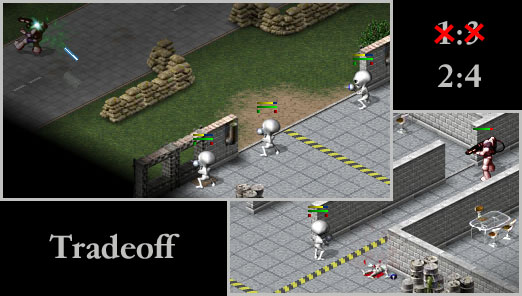
Results: With 3 Sentries
pouring rapid-fire death at it, the Grunt crumpled to the ground. On the
exit route however a Commander appeared from the top of the room and
caught a Sentry with Halt on Sight
on. The Sentry stopped and fired as fast as it could against the
Commander, but a single Sentry vs. a Commander is like a normal human with
a pistol vs.
a Terminator.
Not a pretty sight in other words. I believe the Sentry shot the Commander
3-4 times but as you can see below that hardly mattered.
There
was also trouble in the north from Alias.
Using the superior range and firepower of the Marine army, Alias backed
his forces up and began cutting his way through brick walls of my base
area. Plan: The
two surviving Sentries in the south were to immediately flee eastward away
from the Commander while my the rest of my army cut paths through walls,
recharged, and pulled back from firing positions being destroyed by long-range fire. Turns
12 - 13
Results: Alias's
Commander pursued the retreating Sentries
across the southern edge of the map. An third Sentry coming down from the
north was unable to help its compatriots significantly. What was
significant however was the movement south of a lone WG which hid in the
building above. Plan: With the
support of the WG far to the north it was time to make a stand. I ordered
the obviously targeted Sentry to dodge south before coming back up. This unit would then remain standing
there as
bait. The second Sentry in the meantime would be standing nearby
aiming down the path the first Sentry came from. Also timed to this
setup was the WG, at the spot where a pursuing unit was likely going to
stop the
WG was ordered to fire
2 implosions.
Turn 14
Results: The plan worked perfectly, with
Alias's Commander following its pursue order
precisely and stopped at exactly the right point. The Warp Gunner
critically injured the Commander while the Sentries pinpricked him to
death. The Commander did manage to get off a shot that burned through the
bait Sentry's energy and injured his hp directly. With the death of the
Commander, I took the lead in score 5:4. Far
to the north Alias
continued to burrow into the buildings with long-range fire and now the
bottom Regenerator in the building was visible to the Marines. Click
picture for movie. 458 kb. 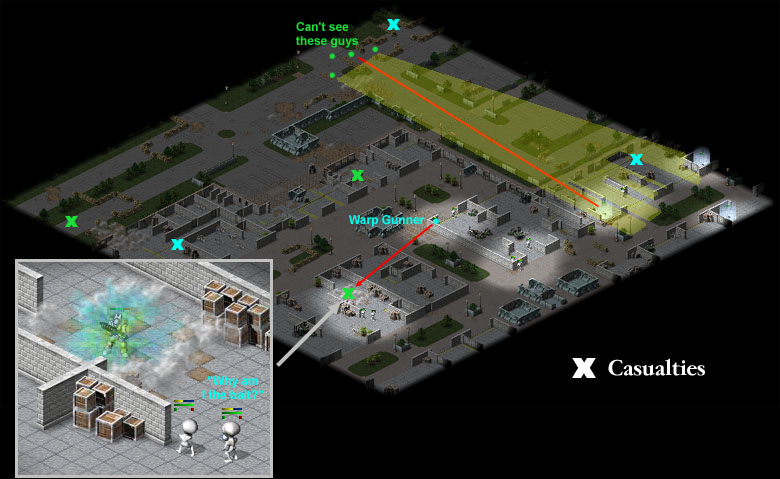
|
Technical
Explanation of the ambush
The
enemy Commander was following a pursue order when the Sentry
dodged south causing it to lose sight of it. As per its
pursue orders, the Commander then ran forward until it regained
sight of the Sentry, which had by then run back up. The other
Sentry in the meantime was firing at the pursuing Commander. When
the first Sentry reappeared the Commander stopped to aim and shoot
at it. The Sentry itself was told to remain standing there as bait
to make sure the Commander stayed right where the implosions would
go off instead of chasing it again. This whole planned ambush
hinged on the Commander being given a pursue order and following
it to the letter. If the Warp Gunner missed... well you can see
how effective the Sentries are without support in the movie.
Don't
understand? Watch the movie its easier. =) |
Plan: The
2 combat weary Sentries headed north to recharge as did the supporting WG which also needed energy. The WG/Psyker combo moved to take over
the WG's area of responsibility in case any enemies appeared with a scouting Sentry
in front for spotting/protection. Turns
15 - 18
Results: The units
needed
recharging headed north but its a long trip and the Sentries were still on
their way there. The Sentry scouting the center-right building found no
Marine units inside and probed further westward. The southern Regen in the
center-right building was also destroyed by long-range fire bringing the
score to 5:5. Plan: The
scouting Sentry along with another recharged one, will continue to probe
west while the WG/Psyker followed a safe distance behind ready to attack any targets sighted by
the scouts. Turns
19 - 22
Results: The scouts for the WG/Psyker
spotted some of Alias's
units retreating south along the western edge to reload and enemy Grunts
scouting my Sentry's building. The WG/Psyker missed 1 Grunt but on a
subsequent turn froze and killed another Grunt giving me a 6:5 lead.
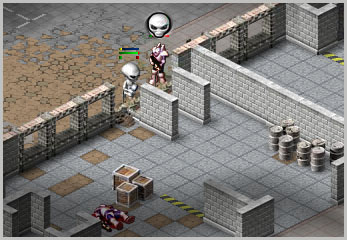
During
th e
last
turn I could see Alias's
troops charging along the north edge of the map toward my base. With my WG/Psyker
short of energy and far out of position it was a deadly threat. Alias
after seeing my WG/Psyker combo to the west, had apparently decided against reloading and instead was bum-rushing
my base while half of my remaining army was
away.Plan: I
ordered my WG/Psyker team to quickly retreat back to
where it could cover my
base. The 2 Sentries from down south had recharged by now and were ordered
to corner dance in front of the Marine units mainly to stall the enemy
advance. The lone WG had also recharged by now and run forward, but I had
a plan to conceal my top Regenerator. With no units running in or out of
the room it was in, Alias wasn't likely to suspect there was anything
inside. I told my lone WG to take the long way to reach the back room to
conceal the existence of the Regenerator.
Turn
23
R esults: All units moved to their assigned
positions, with my forward WG firing a speculative implosion along the
Marines suspected approach route. Alias's Grenadier
also launched grenades at positions
he thought I would fire from while a Commander ran through the building,
probably hoping to arrive before my defenses could form against the new
threat.Alias
also
had a second group digging for my Regenerators and after seeing many units running to and from
the far-right location, burned down the terrain until he could see my eastern-most Regenerator.Plan:
The Commander inside my base area was a serious threat to my base and
needed to be neutralized. Only my expensive units stood a decent chance of
killing or disabling it though since my Sentries' attacks are laughable in
close combat. I had to use my WG/Psyker pair to disable the threat, but
they both had 9 energy left, only enough for 3 shots apiece. The only way
I could recharge my units was to run past the Commander to the
Regenerators, but that would be an almost guaranteed death. In addition,
the 2 Sentries closest to the Commander were almost out of energy as well. I
decided to use my WG/Psyker combo on the trespassing Commander while
running my low-energy Sentries away. The lone WG hiding in the backroom
placed 2 implosions on a Commander and Sniper that were about to snipe at my
eastern Regenerator. The remaining Sentries were ordered to disrupt the Marine
assault and keep them away from my valuable units. Turn
24
Results: Success! The Psyker hit the
Commander dead on, therefore ensuring that the following Warp Gunner
implosions would land on their target. The other Warp Gunner also had an
unexpected success as both the Sniper and Commander to the west remained
stationary, absorbing the full impact of the implosions there. Snipers
aren't built to take damage and this one was no exception. Both a
Commander and a Sniper were killed this round giving me a 11:6 lead.
On the other hand the Sniper and
Commander both were firing shots toward my exposed Regenerator and whether
by accident or intent, one my retreating Sentries took a shot a nd blew apart
in the icky way Greys die.
Alias's
Grenadier also slipped into my base and fired several grenades at the
exposed Regenerator, pretty much guaranteeing its destruction.

Plan: Running the test orders I could see
that my exposed Regenerator was dead. Two grenades were bouncing on their
way and would destroy it soon, but with a hop, skip and a diving leap one
of my Sentries could teleport to the backroom. Even with the significant
point lead I had right now, the situation was still critical. Half my
troops had barely any energy and couldn't safely run to my last
Regenerator to recharge. With their energy this low, practically any of Alias's
units could kill my valuable troops. My
first priority of course was to kill the Grenadier in my base. That little
fellow could discover my hidden backroom or could drop an unlucky grenade
which would do a lot of damage to my low energy troops. I had the Psyker
attack him while bracketing his position on one side with the last of my
southern WG's energy while the hidden WG covered the other end. The
implosions were placed close enough to kill the Grenadier if he stayed in
place or was psyked, but also would
hit him if he ran. Also
coming down was my Sentry outside the backroom on a "kill or die
trying mission". Turn
25
Results: The psyke
successfully went off and ensuring that both bracketing implosions would
blow the Grenadier
down. Visible in the west however was the formation of a Commedic
team near the top and charging Grunts and Medics further down south. The
killing of the Grenadier and my Regenerator made the score 13:7. 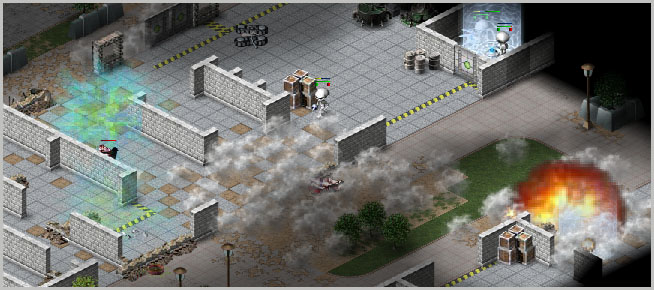
Tactic Box 5
|
|
Commedic |
Commedic team is a unit combo popularized
by Crank in his Grenadier Bible.
This team is composed of a Commander and a Medic. A Commander is a
big imposing SOB with heavy firepower and strong armor. A
Commander teamed up with a Medic who is healing him constantly (1
hp/2 sec when standing still) is potentially an extremely
dangerous threat. Especially against units that do little damage
at a time. |
260 Seconds: Enemy Casualties mounting.
We have done heavy damage to our enemies but they
are rapidly closing in on our position. The men don't know what to
do, but I do. I needed to give them a speech.
I told them about the valiant old days when our
forefathers probed many an Urther with vigor and delight. We must
carry on the traditions passed down to us so that they would not be
forgotten. We must do what we can for victory.
They understood my
message, priming their weapons and readying to move. Next turn we go. For Victory! |
 Home
Forum
Starcraft Tournaments
Home
Forum
Starcraft Tournaments

